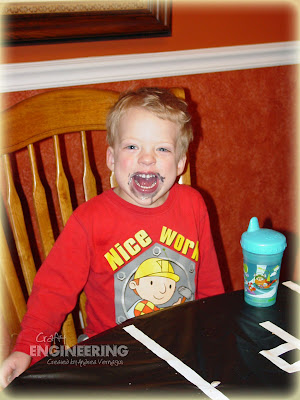
We celebrated my son’s 3rd birthday over the weekend. Still cannot believe that he is 3 already! I am constantly amazed at how much he has grown and learned in those 3 short years. He is a sweet boy that loves to giggle, jump, wrestle, snuggle (at times), and even tease (I think my husband’s and my sarcasm is rubbing off on him already!). Not that we have not had any challenges (sleeping or lack there of is one that we struggle with right now which figures because he was a good sleeping baby), but he is a joyful child full of fun and love! I just want to kiss him a bunch whenever I see him…usually getting the response of “Stop Momma” but then leaning in for more. I could talk about him all day!
For his big Number 3 celebration, I chose to go with a car theme. He loves Hot Wheels cars (actually recognizes the logo and looks for it on the bottom of cars), but since I don’t have Hot Wheels stamps and of course I need to make the invitations, I went with more of a general car theme. I posted the invitation I created already
here. So I set out to decorate for his party to match the theme.
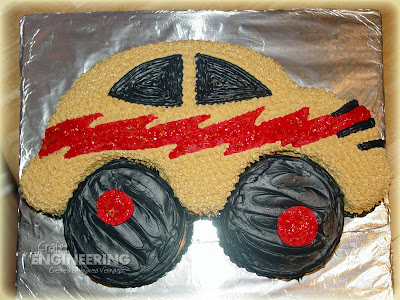
First I knew exactly what the cake had to be and yes (standing very proud right now) I made it myself! It matches the car used on the invitations from Stampin’ Up!’s retired set By Land. What do you think??? I baked the cakes one night and gave myself two nights to frost it…the drop stars taking up most if not all of the second night. They are time
consuming, but they gave it a nice finished look! I cut the main car body out of a 9x13 sheet cake and made the wheels with a 5” round cake pan I got at a local cake supply store. I even found sparkle flakes (edible of course) at the cake supply store to keep my zigzag sparkly like on the invitation! When I finished it, I woke my husband from a peaceful slumber to show him…he didn’t give me the enthusiastic response I hoped for (more of a sleepy monotone “wow, that is great honey”), but he was asleep a second earlier…so what do I expect! (BTW – he gave me the enthusiastic response later the next day once he was awake)

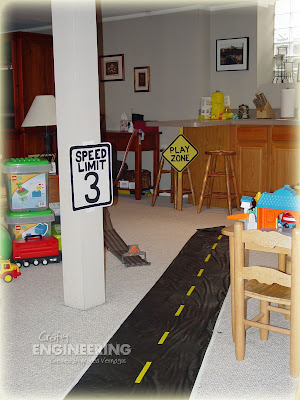
I came up with a fabulous decoration idea to go with the party…I believe I even called myself a genius as I told my husband about the idea. It turned out like I wanted it to, although I had a lot more “road” going throughout the house in my head. The 55 ft of tape, though, didn’t translate into as much as I thought it would, but it was effective and cute nonetheless. I had “road” upstairs (Ranch house) and downstairs (Family room area) and I made road signs and placed them at the eye level of a 3 year old! The road was made from landscape fabric and yellow & white electrical tape (the most expensive part of the decorations) from the home improvement store. The signs were made just with poster board and painted with acrylic paint. All of the wording and lines were free-handed in pencil first and then painted.
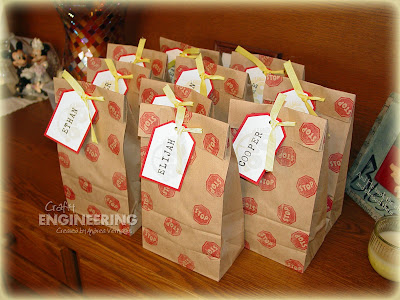

We had 10 kids total (including my son) so I made them each little gift bags which were filled with a Hot Wheel car (of course), Hot Wheels Fruit Snacks, and Hot Wheels Stickers. I kept the gift bags very simple, but stuck with the theme I started with on the invitation. I also created a little “Car Hunt” game in which every kid had to find 10 cards that had a car stamped on it with their names…2 each of 5 colors so that they could have a small “Memory” game to play later. Granted not all of them knew how to spell/read their names, but I think they had fun. Those that did recognize their own names displayed an extra amount of satisfaction in finding their cards…it was so cute! My son was in the latter group…he even had me go and hide his cards again so he could “find his name again”.
A couple of amazing moments during the party: 1) the quietness displayed by 10 kids (ages 4 and under) while they all ate pizza/cake at the same table, 2) my wonderful girlfriends for picking up the toys before they left (without me knowing!), and 3) the fact that we got a picture of all of the kids (remember ages 4 and under) on the couch…ahh the power of cake and ice cream!

So now after all of that, I plan to sit for a few days…my feet and back are still recovering!


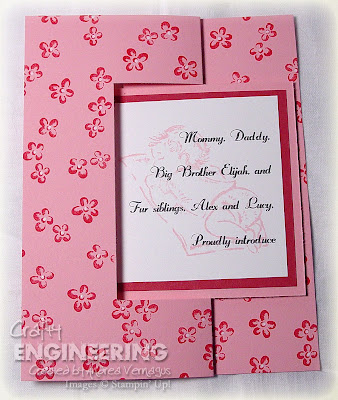 Ever since I saw the Flip-Flop (swing) card, I had it in my head to do baby announcements with it. So I finally did! I took the instructions from SCS (found here) and then altered the sizes to fit my photo and such.
 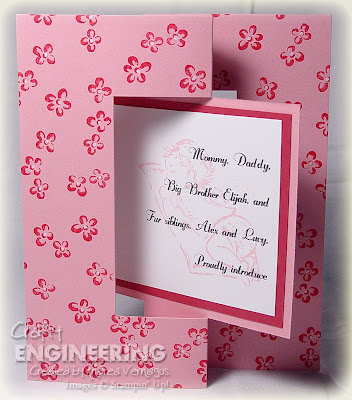 I don't have a whole lot of truly baby stamps, so I borrowed a retired set called Welcome, Little One from a friend. All of the lettering was done on the computer and carefully cut to place everything where I wanted it.
 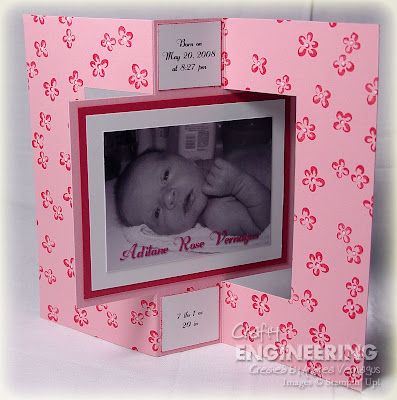 I stamped the flowers in Rose Red and added a dot of White in the centers with the White Gel Pen. The white centers just gave it a complete look...something that was totally lacking prior.
 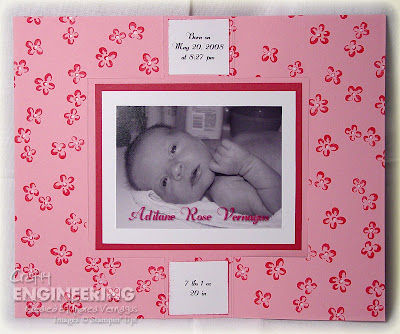 So this was my daughter's birth announcements. Probably a little more time consuming than I thought considering I made 60 (pretty typical with me), but I was very pleased with how they turned out. They took a month to get out...what is the etiquette on the timing of sending out birth announcements anyway? Oh well, better now than never!


